The most important thing about these hats is that they’re made from 100% cotton or a cotton blend that can be washed and reused. Feel free to use linens (sheets, pillow cases, tablecloths or shirts) if no other fabric source is available. Wash and dry any fabric that’s never been used to avoid shrinkage after completion. You’ll find step by step sewing instructions below, but we’ve also created a handy printable pattern with instructions as well as video tutorial here. Read more about how to pool your resources and distribute to your local hospital on our About page.

You will need
0.25 m lining cotton fabric*0.25 m exterior cotton fabric*Paper (for printing the pattern at 100%)PrinterRuler / Tape measureScissorsTape (clear or masking)Pencil or Fabric markerThreadChopstick, envelope opener or pencil (helps push out corners)PinsIron
* These two fabrics can be the same colour / pattern or two different fabric patterns that can help you distinguish between the ‘top of the head’ piece and the ‘tie around the head’ piece. Concept
Each hat requires 1 Piece A and 2 Piece B’s

Method
1. Print pattern Piece A from Instructions PDF (Pg 5-8). Confirm with your measuring tape or ruler that your printed pattern is to scale by checking that the printed 1” square is accurate to your measurement (if metric, should measure 2.5 cm). Now go ahead and print pattern B’s pieces.
Use scissors to cut out pattern Piece A (top of the head piece) + Piece Bs (wrapping around the head piece).
NOTE: If you have limited fabric it’s possible to make a Scrub hat with only 1 Piece A + 1 Piece B. However, you will need to hem or finish the edges of B all the way around B. If you have a serger this is quick work. Turning over 0.5 cm and then another 0.5 cm and hemming it with a straight stitch will also work.

2. You will need to tape together all the parts that make Piece B. Note: The widest part of Piece B must be placed on a fold line of your fabric (see pink arrow below).

3. Iron your fabric, and place Pattern Piece B so that it is lying against the fold.

4. Position Pattern Piece B on your fabric, and flip it as depicted in the photo to reduce fabric wastage and maximum number of hats. (Check how many times you can flip Pattern Piece B as depicted in the photo. In our example we flipped Pattern Piece B four times and got two Pattern A’s out of the remainder.) Pin the pattern pieces to your fabric and cut around them.

5. Once you have one Piece A and two Piece Bs, take your Piece A and fold the straight edge over 1 cm and then fold a second time 1 more cm and press with your iron. Sew that newly pressed edge so that it stays closed with a straight seam.

6. With good sides together place your two Piece Bs on top of each other. Fold them in half and press down the fold with your finger to make a crease. Now re-open it and with your tape measure, count 14” from your crease line and place a mark with your pencil on the curved line of Piece B fabric (see pink arrow in photo to the right). Repeat this on the other side of the crease as well.

7. With the two Piece Bs (good sides facing each other), begin pinning at the 14” mark, down along the short edge and then down the long edge as depicted by the pink line below. Be sure to tack or anchor those first few stitches at the pencil marks with a few reverse stitches. Begin sewing at your 14” mark with a straight stitch, all the way around the straight edge and back up to the other 14” mark. Remove pins.

8. Snip the corners of the short ends diagonally to reduce bulk. Flip your fabric inside out and use a chopstick (or alternative) to fully poke out the corners.
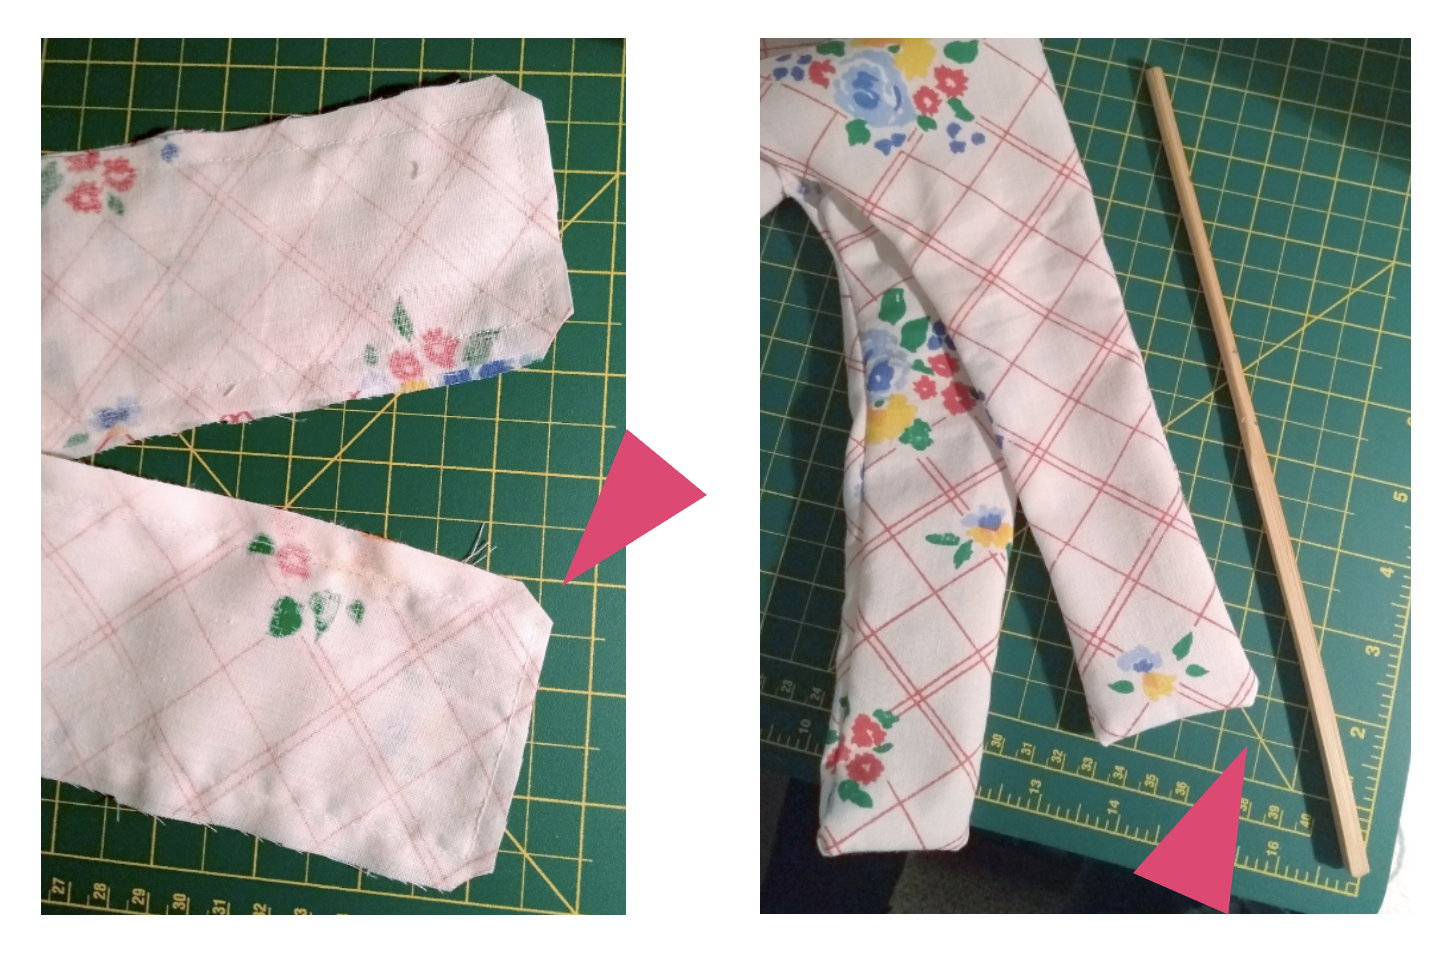
9. Now that you’ve turned your long strip edges inside out, press the whole Piece B with your iron. Turn under by 1 cm the curved open edges of both Piece Bs and press with the iron.

10. Making the hat – Align the centre of the open edge of Piece B with the centre top of Piece A. Insert the top of Piece A within the two folded edges of Piece B and pin as depicted in the photo. As you pin, continue to rotate Piece A which should bring it to meet the 14” mark on Piece B. Before sewing, check that the pins have captured both the upper and lower edges of Piece B.

11. Begin a top stitch from about 2” beneath your pencil mark and anchor back and forth with a reverse stitch
(to strengthen this stress point). Continue sewing straight stitch over your curved and pinned area (removing pins as you go to avoid breaking your machine needle). As you come to the other 14” mark stitch 2” beyond it as well and secure it with your reverse stitch. Flip your hat inside out to check that no edges have been missed.

Congratulations you’re done!
Note: When arranging delivery of your scrub hats to your local hospital(s) / health care contact, check with them on the best approach to delivery. Currently we’ve been recommended to use a cloth bag rather than a plastic bag as any possible virus contamination will die sooner on fabric than on plastic. (Our donated scrub hats are also being laundered by the hospital prior to being worn by nurses and docs.)